Background:
The Baron's Boast of Hunters, founded by Baroness Ruadh, consists of members of the Society for Creative Anachronism who are interested in the skills practised by medieval hunters. We have held several workshops under the guidance of Baroness Cassandra Boell von Bayer at which we have begun to learn humane butchering of fowl and rabbits. In order to use as much of these animals as possible, we want to turn the rabbit skins into parchment for our scribes. These are my notes from my first experiences with this process. My thanks to Baroness Cassandra for sharing her knowledge!
Mistress Ygraine of Kellswood
Barony of Carolingia, East Kingdom
Steps:
12/05/04 - Rabbit butchering workshop at Ruadh's home. The meat from today's rabbits will be used by the Cook's Guild of Carolingia. We used razor blades to skin the rabbits, leaving the skins "cased" (ie: not split up the belly). I froze my rabbit skin for later processing. I also placed 4 feet and 1 tail into a jar of salt to dessicate them.
4/15/05 - Finally got some lime. Home Depot had "lawn lime" (ground limestone for landscaping purposes); 40# bag for $2.99.
5/09/05 - Defrosted my rabbit skin. Placed skin, fur side out, in a plastic bucket of water and lime. (Approximately 1 gallon water to 1/2 cup lime.) Stirred with a stick once or twice daily.
5/12/05 - Cassandra and I butchered 3 more rabbits at her home. We did not need knives or razor blades to skin them, but made starting cuts and simply pulled the skins down the carcass. (As at the workshop, they were hung by their back feet from 2 nails.) This was MUCH quicker and easier than cutting. Cassandra says the younger the animal, the easier it is to skin this way. Cassandra gave me 2 matching pelts (so I can try to tan them for fur) and the meat from 1; all are in my freezer for later use.
5/13/05 - Bucket is starting to smell a bit "ripe". Changed to fresh water and lime. Fur has barely started to slip.
5/14/05 - Parchment making workshop at Ruadh's home. My rabbit skin is the only one we could work on. On some areas, the fur was easy to pull off; on others, it does not come out at all. With Orlando's persistence and everyone taking a turn, a good area of the belly was cleared of fur and cut out (rabbit 1, part a); the rest of the skin will be soaked more until the fur slips easily (rabbit 1, part b). We continued working on "part a". The skin is very white, fairly thin but strong, very slippery -- and a bit stinky. Cassandra identified for us some flesh and muscle which needs to be removed from the skin, and we took turns scraping it off. We then stretched the skin out on plywood and stapled it down to dry. (Staple the mid-point of a side, then pull the opposite side taut and staple; then do mid-point of top, then bottom; work out from mid-point staples, doing corners last.) Cassandra gave me 2 partially thawed skins to start soaking for the next workshop. Put "part b" and the 2 new skins into water and lime when I got home; stirred daily.
|
5/18/05 - I checked "part b", and the fur now slips off easily. I cleared it of fur, rinsed it and laid it out to scrape. None of the muscle is coming off, so I stapled it to plywood in the hope that scraping will be easier when it is partially dry. This piece is a little longer than "part a"; it looks narrower because the muscle is still attached so it cannot be fully stretched. Other 2 skins put into fresh water and lime. "Part a" has dried off-white. Thicker areas are lighter; thinner areas are darker and translucent, with some expelled oils. I removed "part a" from the plywood and began sanding it smooth, using a small wood block and #100 sandpaper. I did a small amount of sanding on the fur side, then focused on the flesh side. The excess material from the lighter areas comes off slowly as a powder. Occasionally, the fibres will roll up. The first time this happened I pulled the edge of the roll; it quickly "travelled" across the skin, leaving a very thin, fragile area. I won't do that again! Just like peeling dead skin after a sunburn, it is too easy to run into good skin and damage it. I continued to sand, trying to bring the thicker areas down to the same transparency as the thinner areas. Holding the skin up to a light helps for checking progress. Except for a few tiny holes where I sanded too much, the piece looks pretty good. It's not finished yet, but my arms got too tired to continue. Using a damp paper towel, I wiped the dust off both sides and tacked the piece back down on plywood to keep it flat. |
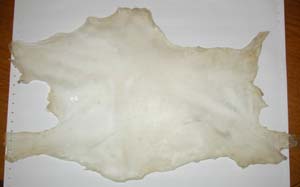
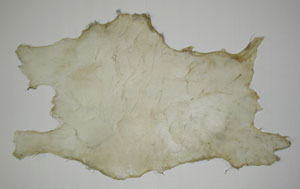 5/18: Rabbit 1, part a, after drying but before sanding.
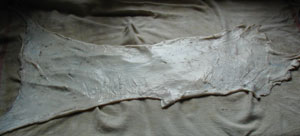 5/18: Rabbit 1, part b, after removing fur.
 5/18: Rabbit 1, part b, drying.
|
5/29/05 - The other 2 skins have been soaking for about 1 day too long; rusty-looking globs are floating on top of the water, and they are *less* stinky but really gross. (I did not have time to attend to them before today.) I think I have caught them before they have spoiled. These have more fat and flesh attached than the skins from the workshop, and that is pretty rancid; I pick off what I can, and slip off the fur, which comes off pretty easily. The skin seems much more fragile than the two pieces of rabbit 1 I have worked on before, probably the result of almost rotting in the lime bath. The photo I took, showing how the fur slips off, was corrupted and lost. I clean the two skins and rinse them well, bag and label them, and stick them in my freezer for the next workshop.
|
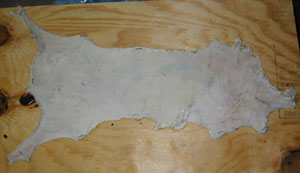
6/07/05 - I referred to several sources seeking suggestions for medieval methods to use on this project. The most important thing I learned (or was reminded) was that "vellum" refers specifically to calf skin; "parchment" is the correct term for all other animal skins prepared for writing on. (See "The Materials and Techniques of Medieval Painting" by Daniel V. Thompson, ISBN 0-486-20327-1, pages 23 to 30.) Skins were stretched on an open frame by tying pepples into the edge of the skin and running the cords out to pegs in the frame which could be turned to tighten the skin. A "lunellarium", a crescent-moon-shaped knife with a burred (turned under) edge, was used to scrape the skin to a uniform thickness. Skins were often soaked twice in lime. When dry, they were rubbed with pumice. They could also be treated with alum if a hard surface was desired. At the hardware store, the only tool I could find with a turned-under edge was a paint scraper; tried it on rabbit 1 part b, damp, and it worked pretty well; much easier than using the various knives I had tried. I got as much more flesh and muscle off the piece as I could, rinsed it well, and stretched and stapled it back onto plywood to dry. I removed rabbit 1 part a from its plywood, did a little bit more sanding, and then considered it DONE! Working around a couple of small holes, I marked the 2 largest rectangular areas and cut them out with a single-edged razor blade. I cut the remainder into several other rectangles, and have several tiny projects in mind for the larger scraps. I will keep all the scraps in case someone wants to make their own hide glue. Yield of rectangular pieces is: two 3.5" x 5"; one 2.5" x 3.5"; one 2" x 2.75"; and three 1.5" x 2". Next step? To try writing on it! |
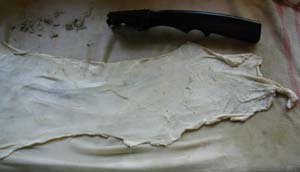 6/07: Rabbit 1, part b, damp, being scraped.
 6/07: Rabbit 1, part a, finished.
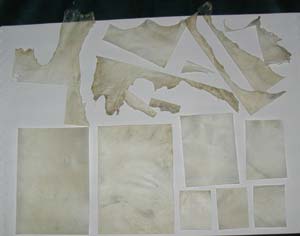 6/07: Rabbit 1, part a, cut into sheets.
|
|
July 2005 - Tried my first lettering on a scrap, and I'm pleased with the results. Surface is about the same as goat skin parchment I have previously used, and not too different from the permagenata (vegetable parchment) I use most often. Did my first bit of illumination, using the 2" x 2.75" piece, and this too worked well. For the versal "S", I used a modern size (Permacoll), gold leaf, my preferred ink (Higgins 'Eternal'), and my usual gouaches (Windsor Newton). All laid-down smoothly! November 2005 - Lettering sample and versal have stood up well to repeated handling and a wide range of temperature and humidity conditions. |
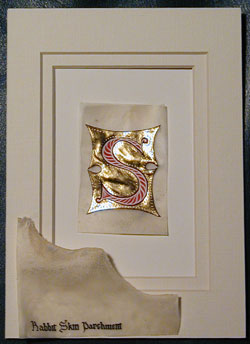 July 2005: First writing and illuminating samples.
|